|
 

|
Sunday, March 19, 2006
Heebie is Frankenstein!
|
I think I may have figured out what is up with the electrical system. This email received from a guy at The Scooter Lounge kind of opens the door to what I think might be the answer...I woke up this morning with a brainstorm about your scooter, looked at pics of your engine and confirmed my suspicions. I believe your motor is a p-series motor. This is a vespa model from the late 70's/early 80's. that's why the stator and flywheel electrical upgrade wouldn't fit. That would explain a lot. What is the VIN on the engine swingarm? I'm guessing it starts with VNX. Philip at the Esso B's had already wondered if I perhaps had a P series engine in the scoot. However, I looked at the VIN on the engine and it was indeed a VBB2 engine. It even matches the original VIN on the Indonesian title I have.
The body is in very good condition. This appears to not be the norm for Asian scooters, but I have looked it over inside and out. There are no dings or dents on the inside of the skin or on the outside. There are also no seams where any welding has taken place. The engine was not in such great shape. When I went inside the thing you could see scars in the case from where something let loose in there! You also see a weld repair around the oil plug. There was also some sort of bonding agent around the drive shaft bearing.
What I think may have happened is the engine let go at some point in the scooter's life and really blew things apart. The body avoided some wear and tear because of the lack of engine power. However, my Indonesian "retorer" got ahold of it and repaired the engine. They actually did a decent job - it ain't pretty but it is solid.
The funky thing they did with it - I believe took the bearing housing and shaft from a P series engine and placed it in the VBB2 engine case. This meant they had to use a P series stator and flywheel. I am told this is possible. I have even read of people taking a VBB2 half of a case and matting it with a P series other half.
So, my guess is that I need to convert my electrical system to a P series diagram... I'm thankful for all the people who are trying help me with this and I'm sure I'll find the answser.
| |
|
Tuesday, March 14, 2006
I feel your pain
|
If only I had a little more time, I would work on the electrical system. Unfortunately, there are lots of other things keeping me busy. I will get to it though...
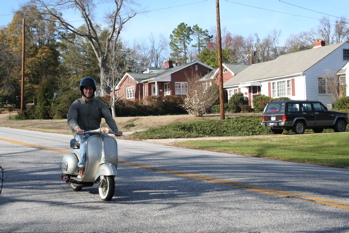
I am enjoying riding. As a matter of fact, I used only the Vespa to get around today. I drove it to the university office and then to my office downtown for a meeting. Little Bimmer never got moved from the driveway.
I got this interesting email today as well.I am located in Halifax, Nova Scotia, Canada. The reason I am contacting you is we both have purchased scooters from Bram in Indonesia. I was less than impressed with the condition of the restoration and am now considering what upgrades i will tackle. I was wondering if I might consult you about some of the hurdles you have hit along the way. I'm going to try to help him as much as I can. I also asked if he would mind me sharing his troubles and tribulations with us here at Vespatude. Us Indonesian dudes need to stick together! I feel his pain and promise I won't talk down at him for buying a scooter from Jakarta.
| |
|
Saturday, March 11, 2006
The never ending story...
|
Right when you think you are making progress in one area, something else comes up to set you back. Nothing big this time. I had hoped to do some more investigating on the wiring front so I could give more information to the folks at ScooterBBS and the Esso B clan.
Unfortunately, I over tightened the header bolts. I broke it off. So, I had to spend most of my time on the Vespa today trying to get it out and replace it. I got it done, but never got anything else done.
| |
|
Wednesday, March 08, 2006
Wiring photo gallery
|
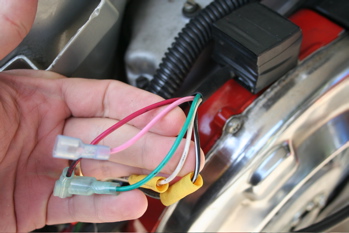
Okay, here is what I have with my wiring. I told the guys (and gals) at ScooterBBS and the Esso B's board that I would put some pictures up for them to look at. Not sure if this will be much help, but at least it might give some ideas.
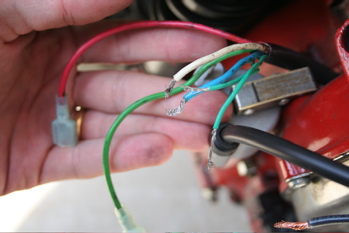
This first picture is the regulator (larger image). You can see that it has five wires. The red and green wires connect to wires from the stator. The pink wire goes to the condenser. The black and the white wires connect to both wires from the stator and the harness.
Here we have the wires coming from the stator (larger image). The red and green wires connect to the red and green wire from the regulator. The blue wire connects to the yellow wire in the wiring harness. the white wire connects to the white wire in the harness as well as the black wire from the regulator. One of the smaller green wires connects to the blue wire in the harness and the other smaller green wire connects to the green wire in the harness.
Confused?
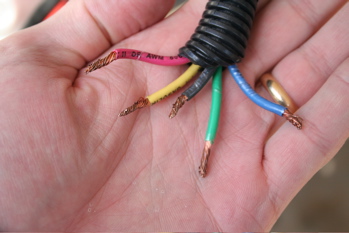
Well, here are the harness wires.
These wires form the loom (larger image). The yellow wire is for the lights. It runs to the taillight and the headlights. The blue wire is just for the brake switch. It runs to the brake switch and the rear brake light. The black wire is the ground wire. In all honesty, I'm not sure what the green and red wire are.
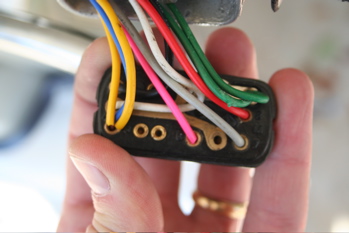
Finally, here is the switch. There are a bunch of wires here!
Let's see if I can remember what all of these are for (larger image). The yellow wires are for the pilot light and rear light. The blue wire is for the speedo bulb. The black wire is the ground. The white and green wires are for the horn. The red wire is for the coil. The pink is for the shut off. The grey is for the headlight.
At least that is what I think the all belong to. Again, my whole system is built on tracing back the original wiring.
I have a funny feeling that the problem rests in the regulator. The bulbs give the impression they are being overloaded when they blow. For instance, the brake light burns when the brake switch is activated regardless of whether the lights are on or not. So, I turn the lights off, activate the brake and then rev the engine. I do not have to rev far before the bulb brightens and then "puff" there goes the bulb.
Hope this might be of a help. I admit that this is where I am in over my head.
| |
|
Tuesday, March 07, 2006
What is going on with my wiring?
|
Yesterday I went home after lunch to grab the Vespa. Once again the weather was just to nice to have it sitting at home. Nothing really to relate. Riding is starting to just seem normal.
There is something I am hoping scooterists out there might be able to help me with. It is the last part of the scooter that I just can't get a handle on. It is the electrical issues that are bugging me.
The bike came with a 12 volt upgrade. I have not done anything except replace the wiring harness. I speced it to be exactly like the old one. I still have the same problems as the old one!
I will put in all new light bulbs. Things start off just fine and if the lights are off or only the pilot light and tail light are running, the scooter runs great. When I turn on the headlight, things start getting funky. The bike will run fine as long as I keep the throttle about one-third open. As soon as I rev past that the bike bogs or stutters. If I flip off the headlight, the bike picks up just great. If I leave the headlight on, it will ultimately blow along with other bulbs in the system.
Any ideas? This is driving me nuts. The headlight bulbs are not always easy to come by. I would appreciate any help someone might give.
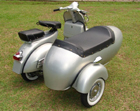
Here is one thing that is somewhat different - thought I can't see how this would be an issue (I don't think). I took the sidecar off and have plans of making a "quick attach" connection for the pod. That meant I had to cut the wire going to the sidecar lamp. I closed off the connection with a regular female electrical plug. The idea being that I would put the male end on the pod side and when I attach the sidecar, I will simply plug it in. However, that means that the circuit is not connected. Would that make any difference? I wouldn't think so, but I'm learning that Vespa electrical systems don't always follow convention!
| |
|
Sunday, March 05, 2006
Falling for Falls Park
|
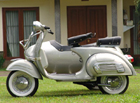
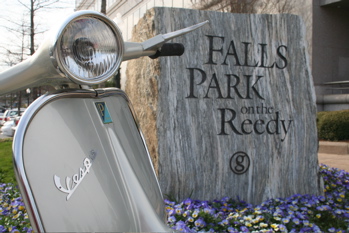
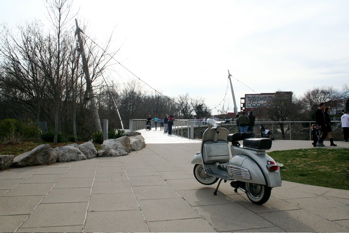
I had a couple of hours this afternoon to get out on the Vespa, so I grabbed my camera and headed down to Falls Park on the Reedy River in downtown Greenville. I went the back way so that I could drive through Cleveland Park and on over to the County Square. There by the entry to the Governor's School for the Arts there is an entry into the park that allows you to get a nice view of the Liberty Bridge.
I left there and headed back around to what I call the Bowater side of the park. That is where the first picture above was taken. Below is another picture taken near the bridge. I had so many people stop to talk to me. I even had someone drive by and ask, "Hey, is that a VBB?" I was impressed. It actually kind of surprised me. Turns out it was a guy from a nearby city who has his own vintage Vespa. He is going to send me some information about local scooter clubs. It is nice the sense of community Heebie seems to create!
The weather in the coming week looks like it will be great. Maybe I'll find a new place to fall for...
| |
|
Saturday, March 04, 2006
The best modification yet!
|
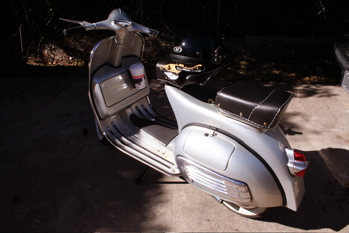
I spent a little time working on the Vespa today. I also took it for a ride to my business partner's house. He lives up on Paris Mountain and is having a deck installed by his backyard pool. I went to check it out and to show him that the scooter would make it up there!
Here you will see one of the most important modifications I have made yet.
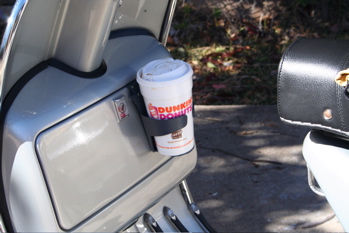
Can't see it? Well, look a little closer...
Yep, I've figured out a way to hold my Dunkin' Donuts coffee cup. After I left Dan's house I swung by Dunkin' Donuts to get me a large coffee. Of course, I wanted to drink it at home. So I put this little cup holder in the front compartment and loaded 'er up. Now, you have to make sure that you have the door well latched and locked! Otherwise, you will dump your coffee all over you. Not a problem this time, I made it the four or five miles from the donut shop without a major problem. Too bad I can't drink and drive!
Well, I'll close up for now. It was a beautiful day (sunny and 63 degrees). Greenville is just wonderful this time of year!
| |
|
Closer, getting closer
|
It has been a week since I took the Paris Mountain ride. I have been able to make quite a bit of progress. Monday and Tuesday I was able to use the scooter as my primary means of transportation. Wednesday and Thursday I had to have room for passengers during the day, so I missed out on riding those days. Yesterday Thing One was home with a fever - 104 at one point. So, I was home again with her.
My package also arrived from Scooterworks. It had all the things I needed to get some of the nagging issues taken care of. I mentioned some of them last week:
- Gas cap: I got a new one that is a traditional cap. Works like a charm!
- Brakes: I went ahead and attached the cable with the brake fully engaged. When I released it, it gave a little so that now my brakes are working as well as I can expect its design to work.
- Gears: Still more progress on this. The shifting is more crisp, but I still have some work to do on 3 and 4.
- Bumping: I found out what this was. First, there is the front end. I realize that there is going to be some bumping just because of the design. However, my main problem was coming from the rear. The engine pinion was loose! So the whole rear suspension was rocking back and forth ever so slightly. You really only noticed it at higher speeds. That has been fixed and has helped much. Also, the front end issues have improved now that I am able to use the back brakes to help slow down.
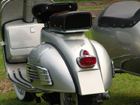
- You will recall that Thing Three broke my headlamp lens. Well, I got a new one yesterday and it is now installed along with a real headlight (I ordered three of them from Scooterworks).
I'll do an update at the end of the day to see how I have progressed...
| |
|
|
|
|
Archives
August 2005
September 2005
October 2005
November 2005
December 2005
January 2006
February 2006
March 2006
April 2006
May 2006
June 2006
July 2006
August 2006
September 2006
October 2006
|